
Cart
Your shopping cart is empty
Continue Shopping
Every Order, Backed by HBADA
30-day in-home Trial
Free 2-5 Business-Day Shipping
5-Year Hassle-Free Warranty
24/7 Customer Support
Remove this item from your cart?
Cart
 How to Adjust Lumbar Support on an Office Chair
That familiar twinge in your lower back around 3 PM isn't just fatigue. Often it's the price of sitting for hours with your spine out of alignment. Lumbar support, when adjusted well, helps preserve the natural curve in your lower back and reduces the strain that leads to that end-of-day ache. But simply having a lumbar support isn't enough—you need to set it up to match your body's shape and the way you work.
Getting it right involves more than twisting a knob. It means understanding how the support interacts with your own posture, the angle you recline, and even the depth of your seat. The following guide walks through why lumbar support matters, how to identify your chair's adjustment type, and a step-by-step method to dial in the right height, depth, and firmness for all-day comfort.
Why Lumbar Support Matters
Your spine has a natural S-curve—an inward dip at the lower back called lumbar lordosis. When you slouch, that curve flattens or even reverses, increasing pressure on spinal discs. According to HBADA's ergonomic chair adjustment guide, maintaining the spine's natural lordotic curve helps distribute pressure evenly across the discs, reducing strain on surrounding muscles and ligaments.
The World Health Organization recommends reducing sedentary time and taking regular movement breaks to avoid static loading of the spine. The U.S. Occupational Safety and Health Administration echoes this, noting that poorly supported sitting can contribute to musculoskeletal discomfort. A well-adjusted lumbar support fills the gap between your lower back and the chair, encouraging a posture that fights the slump and lessens that familiar afternoon ache.
Know Your Chair's Lumbar Mechanism Before Adjusting
Before you adjust anything, locate the controls. Lumbar systems vary widely—some use a firm plastic insert with a tension dial, others rely on a removable pillow, and a few offer multi-point tracking. Identifying yours sets the stage for a meaningful adjustment. A chair with a dynamic lumbar mechanism feels different than a fixed pillow: one moves with you, the other you reposition manually.
Built-in Adjustable Lumbar (Height and Depth)
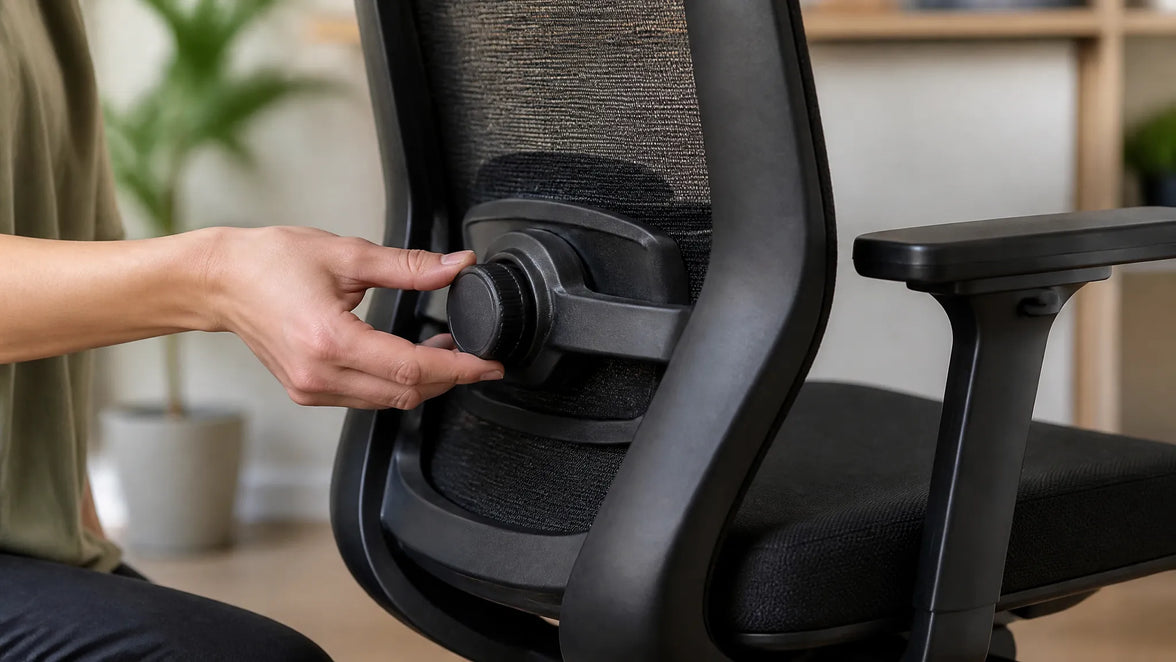
Many ergonomic chairs hide a tension knob on the side of the backrest or a lever under the seat. Turning the knob changes how firmly the support presses into your back—often referred to as depth or firmness. A separate slider or ratchet system moves the entire support up and down to match the curve of your lower spine. Height adjustment raises or lowers the bulge; depth tweaks how much it protrudes.
External Lumbar Pillow
Chairs with fixed backrests often rely on a removable cushion. Pillows lack depth adjustment, but you can shift them higher or lower to match your spine. Place one at the small of the back—just above the belt line—so it centers on the inward curve. Too high and it crowds the ribcage; too low and it presses on the tailbone. Even a modestly thick pillow can make a noticeable difference if positioned correctly.
Chairs with Multi-Point Lumbar Adjustment
Some designs combine height and depth in a single mechanism for finer control. For example, the HBADA E3 Pro Ergonomic Office Chair offers both height and depth lumbar adjustment. A knob behind the mesh backrest lets you raise or lower the lumbar cradle, while a tension dial adjusts how aggressively it pushes forward. Set the height so the support rests at the belt line, then dial the depth until it gently fills the hollow of your back without forcing your pelvis into an exaggerated tilt.
Step-by-Step Lumbar Support Adjustment Guide
A systematic approach helps you tune the support to your body rather than guessing. These steps align with Newtral's lumbar support adjustment guidance and common ergonomic frameworks like the 90-90-90 rule. Start from a baseline posture, then work through height, depth, and movement testing. Spine shape varies, so trust what feels supportive without causing new pressure.
Start with a Neutral Sitting Posture
Before touching the lumbar mechanism, set the rest of the chair. Adjust seat height so thighs are parallel to the floor and feet rest flat. Leave a two- to three-finger gap between the front edge of the seat and the back of your knees—this prevents pressure on the popliteal fold. Position armrests so your elbows form a 90° angle and your shoulders stay relaxed. This baseline ensures the lumbar support works with your whole body, not against it.
Set the Lumbar Height
Find the height adjustment control—typically a knob, lever, or ratchet on the backrest. Move the lumbar piece up or down until it sits squarely in the hollow of your lower back, roughly at belt-line or navel level. You'll know it's correct when the support matches the natural inward curve without digging into the upper pelvis or floating up near your ribs. Many chair backs have markings, but you can also run your hand along the backrest to feel where the bulge peaks.
Adjust Lumbar Depth or Firmness
Turn the depth knob or tension dial to fine-tune how firmly the support pushes into your back. The goal is gentle, continuous contact that encourages the spine's lordotic curve without forcing an arch. If you feel a hard shelf pressing your spine forward, reduce the tension. If the support barely touches your back, it likely won't prevent slouching. Small tweaks—a quarter turn—can make the difference between just sitting there and sitting supported.
Test While Reclining and Moving
Recline to your usual working angle, typically between 95° and 110°, and note whether the lumbar support stays in contact. Some chairs shift the support point when you lean back; the Eureka Ergonomic posture integration guide suggests rechecking alignment after changing the tilt tension. Roll your shoulders, stretch your arms forward as if typing, and see if the support maintains its position. Readjust if it slides up or loses touch.
Common Mistakes When Adjusting Lumbar Support
Even with the right steps, small errors can turn a comfortable chair into a source of irritation. A support placed too high presses on the ribcage and encourages a forward-leaning posture. Set too low, it pushes into the tailbone and flattens the lumbar curve. Dialing in excessive depth can create an anterior pelvic tilt that strains the lower back, while a seat pan that's too deep often scoots you forward, leaving the lumbar support behind. The following table highlights these common pitfalls:
Mistake
What Happens
Quick Fix
Lumbar too high
Pressure on ribcage, forward lean
Lower support to belt-line level
Lumbar too low
Tailbone pressure, flattened curve
Raise support until it fills the hollow
Depth too aggressive
Anterior pelvic tilt, new pain
Reduce tension slightly
Seat depth blocking pelvis
Can't reach backrest, slumping
Adjust seat depth or add back cushion
Recheck your lumbar setting after adjusting other chair features—changing the recline angle or armrest height can alter your sitting geometry enough to require a re-tune.
Troubleshooting: Lumbar Support Still Uncomfortable?
If you've followed the steps and still feel discomfort, step back and look at the whole chair. A seat that's too deep often prevents your pelvis from reaching the backrest, so the lumbar support hits your mid-back instead. Check that you maintain a two- to three-finger gap behind your knees. If the built-in support can't be dialed in well enough, an external lumbar pillow or a rolled towel placed at the small of the back often provides a simple workaround. The World Health Organization emphasizes that even well-adjusted seated posture benefits from movement breaks—stand or stretch for a couple of minutes every half hour to relieve static load on the spine.
Frequently Asked Questions
How high should lumbar support be?
Align the support with the natural inward curve of your lower spine, roughly at belt-line height or just above the hip bones. The bulge should fill the hollow, not press on the ribs or tailbone.
Can I use a pillow instead of built-in lumbar support?
Yes, an external pillow can work well if you position it carefully. Built-in systems offer more precise height and depth control, but a pillow placed at the small of the back can still help you avoid slouching.
How often should I readjust lumbar support?
Recheck the setting whenever you change desk height, alter the chair's recline angle, or if you feel renewed lower back discomfort. A quick re-tune takes seconds and can prevent hours of strain.
Sep 16, 2026
How to Adjust Lumbar Support on an Office Chair
That familiar twinge in your lower back around 3 PM isn't just fatigue. Often it's the price of sitting for hours with your spine out of alignment. Lumbar support, when adjusted well, helps preserve the natural curve in your lower back and reduces the strain that leads to that end-of-day ache. But simply having a lumbar support isn't enough—you need to set it up to match your body's shape and the way you work.
Getting it right involves more than twisting a knob. It means understanding how the support interacts with your own posture, the angle you recline, and even the depth of your seat. The following guide walks through why lumbar support matters, how to identify your chair's adjustment type, and a step-by-step method to dial in the right height, depth, and firmness for all-day comfort.
Why Lumbar Support Matters
Your spine has a natural S-curve—an inward dip at the lower back called lumbar lordosis. When you slouch, that curve flattens or even reverses, increasing pressure on spinal discs. According to HBADA's ergonomic chair adjustment guide, maintaining the spine's natural lordotic curve helps distribute pressure evenly across the discs, reducing strain on surrounding muscles and ligaments.
The World Health Organization recommends reducing sedentary time and taking regular movement breaks to avoid static loading of the spine. The U.S. Occupational Safety and Health Administration echoes this, noting that poorly supported sitting can contribute to musculoskeletal discomfort. A well-adjusted lumbar support fills the gap between your lower back and the chair, encouraging a posture that fights the slump and lessens that familiar afternoon ache.
Know Your Chair's Lumbar Mechanism Before Adjusting
Before you adjust anything, locate the controls. Lumbar systems vary widely—some use a firm plastic insert with a tension dial, others rely on a removable pillow, and a few offer multi-point tracking. Identifying yours sets the stage for a meaningful adjustment. A chair with a dynamic lumbar mechanism feels different than a fixed pillow: one moves with you, the other you reposition manually.
Built-in Adjustable Lumbar (Height and Depth)
Many ergonomic chairs hide a tension knob on the side of the backrest or a lever under the seat. Turning the knob changes how firmly the support presses into your back—often referred to as depth or firmness. A separate slider or ratchet system moves the entire support up and down to match the curve of your lower spine. Height adjustment raises or lowers the bulge; depth tweaks how much it protrudes.
External Lumbar Pillow
Chairs with fixed backrests often rely on a removable cushion. Pillows lack depth adjustment, but you can shift them higher or lower to match your spine. Place one at the small of the back—just above the belt line—so it centers on the inward curve. Too high and it crowds the ribcage; too low and it presses on the tailbone. Even a modestly thick pillow can make a noticeable difference if positioned correctly.
Chairs with Multi-Point Lumbar Adjustment
Some designs combine height and depth in a single mechanism for finer control. For example, the HBADA E3 Pro Ergonomic Office Chair offers both height and depth lumbar adjustment. A knob behind the mesh backrest lets you raise or lower the lumbar cradle, while a tension dial adjusts how aggressively it pushes forward. Set the height so the support rests at the belt line, then dial the depth until it gently fills the hollow of your back without forcing your pelvis into an exaggerated tilt.
Step-by-Step Lumbar Support Adjustment Guide
A systematic approach helps you tune the support to your body rather than guessing. These steps align with Newtral's lumbar support adjustment guidance and common ergonomic frameworks like the 90-90-90 rule. Start from a baseline posture, then work through height, depth, and movement testing. Spine shape varies, so trust what feels supportive without causing new pressure.
Start with a Neutral Sitting Posture
Before touching the lumbar mechanism, set the rest of the chair. Adjust seat height so thighs are parallel to the floor and feet rest flat. Leave a two- to three-finger gap between the front edge of the seat and the back of your knees—this prevents pressure on the popliteal fold. Position armrests so your elbows form a 90° angle and your shoulders stay relaxed. This baseline ensures the lumbar support works with your whole body, not against it.
Set the Lumbar Height
Find the height adjustment control—typically a knob, lever, or ratchet on the backrest. Move the lumbar piece up or down until it sits squarely in the hollow of your lower back, roughly at belt-line or navel level. You'll know it's correct when the support matches the natural inward curve without digging into the upper pelvis or floating up near your ribs. Many chair backs have markings, but you can also run your hand along the backrest to feel where the bulge peaks.
Adjust Lumbar Depth or Firmness
Turn the depth knob or tension dial to fine-tune how firmly the support pushes into your back. The goal is gentle, continuous contact that encourages the spine's lordotic curve without forcing an arch. If you feel a hard shelf pressing your spine forward, reduce the tension. If the support barely touches your back, it likely won't prevent slouching. Small tweaks—a quarter turn—can make the difference between just sitting there and sitting supported.
Test While Reclining and Moving
Recline to your usual working angle, typically between 95° and 110°, and note whether the lumbar support stays in contact. Some chairs shift the support point when you lean back; the Eureka Ergonomic posture integration guide suggests rechecking alignment after changing the tilt tension. Roll your shoulders, stretch your arms forward as if typing, and see if the support maintains its position. Readjust if it slides up or loses touch.
Common Mistakes When Adjusting Lumbar Support
Even with the right steps, small errors can turn a comfortable chair into a source of irritation. A support placed too high presses on the ribcage and encourages a forward-leaning posture. Set too low, it pushes into the tailbone and flattens the lumbar curve. Dialing in excessive depth can create an anterior pelvic tilt that strains the lower back, while a seat pan that's too deep often scoots you forward, leaving the lumbar support behind. The following table highlights these common pitfalls:
Mistake
What Happens
Quick Fix
Lumbar too high
Pressure on ribcage, forward lean
Lower support to belt-line level
Lumbar too low
Tailbone pressure, flattened curve
Raise support until it fills the hollow
Depth too aggressive
Anterior pelvic tilt, new pain
Reduce tension slightly
Seat depth blocking pelvis
Can't reach backrest, slumping
Adjust seat depth or add back cushion
Recheck your lumbar setting after adjusting other chair features—changing the recline angle or armrest height can alter your sitting geometry enough to require a re-tune.
Troubleshooting: Lumbar Support Still Uncomfortable?
If you've followed the steps and still feel discomfort, step back and look at the whole chair. A seat that's too deep often prevents your pelvis from reaching the backrest, so the lumbar support hits your mid-back instead. Check that you maintain a two- to three-finger gap behind your knees. If the built-in support can't be dialed in well enough, an external lumbar pillow or a rolled towel placed at the small of the back often provides a simple workaround. The World Health Organization emphasizes that even well-adjusted seated posture benefits from movement breaks—stand or stretch for a couple of minutes every half hour to relieve static load on the spine.
Frequently Asked Questions
How high should lumbar support be?
Align the support with the natural inward curve of your lower spine, roughly at belt-line height or just above the hip bones. The bulge should fill the hollow, not press on the ribs or tailbone.
Can I use a pillow instead of built-in lumbar support?
Yes, an external pillow can work well if you position it carefully. Built-in systems offer more precise height and depth control, but a pillow placed at the small of the back can still help you avoid slouching.
How often should I readjust lumbar support?
Recheck the setting whenever you change desk height, alter the chair's recline angle, or if you feel renewed lower back discomfort. A quick re-tune takes seconds and can prevent hours of strain.
Sep 16, 2026
 How to Test an Ergonomic Office Chair During a 30-Day Home Trial
The quick answer
To test an ergonomic office chair during a 30-day home trial, use it for your real work each day and check fit, lumbar support, breathability, recline, armrests and noise. Keep the packaging, avoid damage, and decide before the window closes. If the chair does not suit you, contact support early enough to complete the required return steps within your return window.
Table of Contents
Jump to the part of the trial you need.
01. What is a 30-day home trial?
02. How should you set up the chair?
03. What should you test in week one?
04. What should you test in weeks two to four?
05. How do you protect return eligibility?
06. What should you check before returning?
07. Which HBADA chairs can you test?
08. Your 30-day test plan
09. Limitations and when to get help
10. Conclusion
11. Frequently asked questions
12. Sources and useful links
What Is a 30-Day Home Trial and How Does It Work?
A home trial is a return window that lets you use the chair in your real setup before you commit. HBADA’s current return and refund policy allows returns within 30 days of receipt, subject to its condition and return requirements.
This gives you time to judge an adjustable ergonomic chair at your own desk, not in a showroom. Testing may help you find a more comfortable sitting position, but it is not a medical treatment.
How Should You Set Up the Chair for Testing?
Start well, because a fair test needs a proper setup. Assemble the chair using the HBADA user manual and assembly guide, and keep every part of the packaging, including the box, foam and spare hardware. Then set it to your body before you judge it.
Set the seat height so your feet rest flat on the floor or a suitable footrest.
Set the seat depth so two to three fingers fit behind your knees.
Set the lumbar support to meet your lower back.
Set the armrests so your forearms are supported and your shoulders stay relaxed.
Check that you can reach your keyboard and mouse comfortably.
Only after this setup should you decide how the chair feels.
What Should You Test in the First Week?
Your first week is about first impressions and daily fit.
Fit: Check you can reach a feet-flat, back-supported position within the chair’s adjustment ranges.
Lumbar support: Notice whether the support meets your lower back through your normal workday.
Breathability: Watch for heat build-up and check whether the mesh and seat feel comfortable in your room.
Noise and casters: Roll across your floor and listen for creaks or scuffs. Check that the casters are suitable for the surface.
What Should You Test in Weeks Two to Four?
Later weeks reveal how the chair holds up over real work.
Now test the chair as an office chair for long hours. Work a normal week, keeping your usual movement breaks, and notice whether early comfort lasts into the afternoon. Move through the available recline positions and check that the locks hold. Use the armrests while you type, write and relax.
Give yourself time to learn the controls and fine-tune the settings, but do not treat pain as a required adjustment phase. If discomfort eases after a setting change, note what helped. If it persists after reasonable adjustments, the chair may not fit you.
A Quick Test-and-Decide Table
Use this table to turn each check into a clear next step.
What to test
How to test it
Keep or return signal
Fit
Set seat height, depth and lumbar support to your body, then sit back fully.
Consider a return if you cannot achieve supported feet and back within the adjustment ranges.
Lumbar support
Use it during a normal working day and note lower-back comfort.
Consider a return if the support cannot meet your lower back comfortably after adjustment.
Breathability
Check for heat build-up during ordinary work sessions.
Consider another material or model if the seat consistently feels too warm for you.
Recline and lock
Try the recline settings according to the manual.
Stop using the chair and contact support if the recline is unstable or a lock fails.
Armrests
Type, write and relax while checking forearm support.
Consider a return if the armrests prevent a relaxed working position or access to your desk.
Noise and casters
Roll gently across a suitable floor surface and listen for persistent noise.
Contact support about recurring creaks or floor marking before continuing use.
Long-session comfort
Work a normal week in the chair, with movement breaks.
Reassess the fit if discomfort persists after you fine-tune the settings.
How Do You Protect Your Return Eligibility?
Test thoroughly, but keep the chair returnable while you decide.
Keep the original box, foam and hardware for the whole trial.
Keep the chair clean and unmarked, and use a suitable floor mat if needed.
Note your delivery date and the last day of the return window.
Contact support early if you are unsure, rather than on the final day.
HBADA requires returns in their original condition and recommends keeping the original packaging. Missing packaging or damage from improper packing may lead to fees.
What Should You Check Before Returning the Chair?
Review the return instructions for your order before arranging collection. For change-of-mind returns, customers pay part of the return shipping cost; HBADA may provide a discounted prepaid label deducted from the refund. For damaged, defective or incorrectly supplied items, contact support for the appropriate process.
Ask support to confirm the required steps and deadline. A return window is separate from warranty coverage, so check the HBADA warranty and service information if a fault appears later.
Which HBADA Chairs Can You Test at Home?
The HBADA X7 and E3 Pro 2026 product pages advertise a 30-day home trial. Confirm the current terms for your chosen model and order before purchasing.
Use the same testing checklist for either chair, but pay attention to the features that make each model different.
What to compare
HBADA X7
HBADA E3 Pro 2026
Lumbar support
Test how the AI lumbar-tracking system responds when you change position.
Test how the three-zone adaptive lumbar support fits your lower back.
Seat fit
Check the selected model’s seat dimensions and adjustment range against your body and desk.
Check the selected model’s seat dimensions and adjustment range against your body and desk.
Recline and armrests
Check support and control access while typing, leaning back and relaxing.
Check the headrest, armrest and recline adjustments during your usual tasks.
Additional features
Try the comfort functions included with your selected version, following its manual.
Focus on mechanical adjustments, mesh comfort and any optional footrest.
Before ordering
Confirm the exact configuration, return conditions and warranty.
Confirm the exact configuration, return conditions and warranty.
If you want automatic lumbar tracking, explore the HBADA X7 smart ergonomic chair and check the comfort features included with your selected version.
If you want a mechanically adjustable chair to test for long workdays, compare the HBADA E3 Pro 2026. You can also browse the HBADA ergonomic office chair collection before your trial begins.
Your 30-Day Test Plan
Follow this simple plan so nothing is missed before the window closes. Adjust the timing to leave enough time for the return process required for your order.
Day 1
Assemble and Adjust
Assemble by the manual, keep all packaging, and set the chair to your body.
Days 2–7
Check Daily Fit
Test daily fit, lumbar support, breathability, noise and casters.
Days 8–21
Test Your Normal Work Routine
Work your usual schedule and test recline, armrests and long-session comfort. Keep taking movement breaks.
Days 22–27
Fine-Tune and Decide
Fine-tune settings and review your notes. If the chair is not right, contact support now to confirm the return steps and deadline.
Days 28–30
Complete Your Decision
Keep the chair if it fits your needs, or complete the return steps within the applicable deadline. Do not assume contacting support on day 30 automatically extends the window.
Limitations and When to Get Help
A trial answers many questions, but not every one.
A trial checks comfort and fit for you; it cannot promise a health outcome.
Thirty days cannot establish the chair’s lifespan or long-term durability.
Keep the chair and packaging in good condition while deciding.
Trial terms, return shipping and warranty can vary by market and order, so check the applicable policy.
If you have severe, persistent or radiating pain, consult a qualified healthcare professional. A chair is not a medical treatment.
Conclusion
The best way to judge an ergonomic office chair is to test it where you actually work. Assemble it, set it to your body, use it for real tasks, and keep the packaging until you are sure. Compare the X7 if you want automatic lumbar tracking, or the E3 Pro if you prefer mechanical adjustments. Make your decision before the return deadline, and keep the chair that fits you.
Frequently Asked Questions
How long is the HBADA home trial?
The current .com policy states 30 days from receipt. Confirm the terms and required return steps for your order before testing.
Can you return an office chair after using it?
Home testing does not remove the policy’s condition requirements. Keep the chair clean, avoid damage, and ask support if you are unsure whether its condition qualifies.
How long does it take to get used to a new ergonomic chair?
There is no fixed adjustment period for everyone. You may need several sessions to learn the controls and fine-tune the seat height, depth, lumbar support and armrests. Change one setting at a time. Do not keep sitting through pain in the hope that you will eventually adapt.
Who pays for return shipping?
It depends on the return reason. Check the shipping-cost section of the return policy and confirm any label charge with support before booking a courier.
What should you check before the trial ends?
Confirm the essentials: fit, long-session comfort, lumbar support, breathability, recline, armrests and noise. Also check that the chair suits your desk height and floor. Decide early enough to complete any required return steps before the deadline.
Sources and Useful Links
HBADA Return and Refund Policy
HBADA Warranty and Service
HBADA User Manuals and Assembly Guides
HBADA X7 Product Details
HBADA E3 Pro 2026 Product Details
Sep 16, 2026
How to Test an Ergonomic Office Chair During a 30-Day Home Trial
The quick answer
To test an ergonomic office chair during a 30-day home trial, use it for your real work each day and check fit, lumbar support, breathability, recline, armrests and noise. Keep the packaging, avoid damage, and decide before the window closes. If the chair does not suit you, contact support early enough to complete the required return steps within your return window.
Table of Contents
Jump to the part of the trial you need.
01. What is a 30-day home trial?
02. How should you set up the chair?
03. What should you test in week one?
04. What should you test in weeks two to four?
05. How do you protect return eligibility?
06. What should you check before returning?
07. Which HBADA chairs can you test?
08. Your 30-day test plan
09. Limitations and when to get help
10. Conclusion
11. Frequently asked questions
12. Sources and useful links
What Is a 30-Day Home Trial and How Does It Work?
A home trial is a return window that lets you use the chair in your real setup before you commit. HBADA’s current return and refund policy allows returns within 30 days of receipt, subject to its condition and return requirements.
This gives you time to judge an adjustable ergonomic chair at your own desk, not in a showroom. Testing may help you find a more comfortable sitting position, but it is not a medical treatment.
How Should You Set Up the Chair for Testing?
Start well, because a fair test needs a proper setup. Assemble the chair using the HBADA user manual and assembly guide, and keep every part of the packaging, including the box, foam and spare hardware. Then set it to your body before you judge it.
Set the seat height so your feet rest flat on the floor or a suitable footrest.
Set the seat depth so two to three fingers fit behind your knees.
Set the lumbar support to meet your lower back.
Set the armrests so your forearms are supported and your shoulders stay relaxed.
Check that you can reach your keyboard and mouse comfortably.
Only after this setup should you decide how the chair feels.
What Should You Test in the First Week?
Your first week is about first impressions and daily fit.
Fit: Check you can reach a feet-flat, back-supported position within the chair’s adjustment ranges.
Lumbar support: Notice whether the support meets your lower back through your normal workday.
Breathability: Watch for heat build-up and check whether the mesh and seat feel comfortable in your room.
Noise and casters: Roll across your floor and listen for creaks or scuffs. Check that the casters are suitable for the surface.
What Should You Test in Weeks Two to Four?
Later weeks reveal how the chair holds up over real work.
Now test the chair as an office chair for long hours. Work a normal week, keeping your usual movement breaks, and notice whether early comfort lasts into the afternoon. Move through the available recline positions and check that the locks hold. Use the armrests while you type, write and relax.
Give yourself time to learn the controls and fine-tune the settings, but do not treat pain as a required adjustment phase. If discomfort eases after a setting change, note what helped. If it persists after reasonable adjustments, the chair may not fit you.
A Quick Test-and-Decide Table
Use this table to turn each check into a clear next step.
What to test
How to test it
Keep or return signal
Fit
Set seat height, depth and lumbar support to your body, then sit back fully.
Consider a return if you cannot achieve supported feet and back within the adjustment ranges.
Lumbar support
Use it during a normal working day and note lower-back comfort.
Consider a return if the support cannot meet your lower back comfortably after adjustment.
Breathability
Check for heat build-up during ordinary work sessions.
Consider another material or model if the seat consistently feels too warm for you.
Recline and lock
Try the recline settings according to the manual.
Stop using the chair and contact support if the recline is unstable or a lock fails.
Armrests
Type, write and relax while checking forearm support.
Consider a return if the armrests prevent a relaxed working position or access to your desk.
Noise and casters
Roll gently across a suitable floor surface and listen for persistent noise.
Contact support about recurring creaks or floor marking before continuing use.
Long-session comfort
Work a normal week in the chair, with movement breaks.
Reassess the fit if discomfort persists after you fine-tune the settings.
How Do You Protect Your Return Eligibility?
Test thoroughly, but keep the chair returnable while you decide.
Keep the original box, foam and hardware for the whole trial.
Keep the chair clean and unmarked, and use a suitable floor mat if needed.
Note your delivery date and the last day of the return window.
Contact support early if you are unsure, rather than on the final day.
HBADA requires returns in their original condition and recommends keeping the original packaging. Missing packaging or damage from improper packing may lead to fees.
What Should You Check Before Returning the Chair?
Review the return instructions for your order before arranging collection. For change-of-mind returns, customers pay part of the return shipping cost; HBADA may provide a discounted prepaid label deducted from the refund. For damaged, defective or incorrectly supplied items, contact support for the appropriate process.
Ask support to confirm the required steps and deadline. A return window is separate from warranty coverage, so check the HBADA warranty and service information if a fault appears later.
Which HBADA Chairs Can You Test at Home?
The HBADA X7 and E3 Pro 2026 product pages advertise a 30-day home trial. Confirm the current terms for your chosen model and order before purchasing.
Use the same testing checklist for either chair, but pay attention to the features that make each model different.
What to compare
HBADA X7
HBADA E3 Pro 2026
Lumbar support
Test how the AI lumbar-tracking system responds when you change position.
Test how the three-zone adaptive lumbar support fits your lower back.
Seat fit
Check the selected model’s seat dimensions and adjustment range against your body and desk.
Check the selected model’s seat dimensions and adjustment range against your body and desk.
Recline and armrests
Check support and control access while typing, leaning back and relaxing.
Check the headrest, armrest and recline adjustments during your usual tasks.
Additional features
Try the comfort functions included with your selected version, following its manual.
Focus on mechanical adjustments, mesh comfort and any optional footrest.
Before ordering
Confirm the exact configuration, return conditions and warranty.
Confirm the exact configuration, return conditions and warranty.
If you want automatic lumbar tracking, explore the HBADA X7 smart ergonomic chair and check the comfort features included with your selected version.
If you want a mechanically adjustable chair to test for long workdays, compare the HBADA E3 Pro 2026. You can also browse the HBADA ergonomic office chair collection before your trial begins.
Your 30-Day Test Plan
Follow this simple plan so nothing is missed before the window closes. Adjust the timing to leave enough time for the return process required for your order.
Day 1
Assemble and Adjust
Assemble by the manual, keep all packaging, and set the chair to your body.
Days 2–7
Check Daily Fit
Test daily fit, lumbar support, breathability, noise and casters.
Days 8–21
Test Your Normal Work Routine
Work your usual schedule and test recline, armrests and long-session comfort. Keep taking movement breaks.
Days 22–27
Fine-Tune and Decide
Fine-tune settings and review your notes. If the chair is not right, contact support now to confirm the return steps and deadline.
Days 28–30
Complete Your Decision
Keep the chair if it fits your needs, or complete the return steps within the applicable deadline. Do not assume contacting support on day 30 automatically extends the window.
Limitations and When to Get Help
A trial answers many questions, but not every one.
A trial checks comfort and fit for you; it cannot promise a health outcome.
Thirty days cannot establish the chair’s lifespan or long-term durability.
Keep the chair and packaging in good condition while deciding.
Trial terms, return shipping and warranty can vary by market and order, so check the applicable policy.
If you have severe, persistent or radiating pain, consult a qualified healthcare professional. A chair is not a medical treatment.
Conclusion
The best way to judge an ergonomic office chair is to test it where you actually work. Assemble it, set it to your body, use it for real tasks, and keep the packaging until you are sure. Compare the X7 if you want automatic lumbar tracking, or the E3 Pro if you prefer mechanical adjustments. Make your decision before the return deadline, and keep the chair that fits you.
Frequently Asked Questions
How long is the HBADA home trial?
The current .com policy states 30 days from receipt. Confirm the terms and required return steps for your order before testing.
Can you return an office chair after using it?
Home testing does not remove the policy’s condition requirements. Keep the chair clean, avoid damage, and ask support if you are unsure whether its condition qualifies.
How long does it take to get used to a new ergonomic chair?
There is no fixed adjustment period for everyone. You may need several sessions to learn the controls and fine-tune the seat height, depth, lumbar support and armrests. Change one setting at a time. Do not keep sitting through pain in the hope that you will eventually adapt.
Who pays for return shipping?
It depends on the return reason. Check the shipping-cost section of the return policy and confirm any label charge with support before booking a courier.
What should you check before the trial ends?
Confirm the essentials: fit, long-session comfort, lumbar support, breathability, recline, armrests and noise. Also check that the chair suits your desk height and floor. Decide early enough to complete any required return steps before the deadline.
Sources and Useful Links
HBADA Return and Refund Policy
HBADA Warranty and Service
HBADA User Manuals and Assembly Guides
HBADA X7 Product Details
HBADA E3 Pro 2026 Product Details
Sep 16, 2026
 HBADA ID.me Discount for Military, Teachers & Healthcare
Exclusive Community Savings
Exclusive HBADA ergonomic chair discounts for military members, first responders, healthcare professionals, educators and students through ID.me.
✓ Quick Answer
Eligible military members, veterans, first responders, hospital employees, medical providers, nurses and teachers can currently receive 6% off HBADA ergonomic chairs through ID.me. Eligible students can receive 5% off. Complete ID.me verification and confirm the discount in your checkout total before placing the order.
What this guide covers
Better support for demanding workdays
Who is eligible
How to claim the discount
Why HBADA uses ID.me
How to choose the right chair
Important discount terms
Frequently asked questions
Verify your status and save
Better Support for Demanding Workdays
Military members, first responders, healthcare professionals, educators and students support our communities every day. HBADA is proud to recognize their contributions with exclusive savings on ergonomic office chairs through ID.me.
Whether you work long shifts, study for extended hours or spend your day supporting others, a properly adjustable chair can help you build a more comfortable workspace.
People working in healthcare, public safety, education and military-related roles often face demanding schedules. Some spend long periods completing reports, coordinating teams, studying, attending virtual meetings or handling administrative responsibilities.
A suitable ergonomic chair should do more than provide a place to sit. It should allow the user to adjust the chair to their body, desk and daily tasks.
↕
Personalized Adjustment
Look for adjustable seat height, seat depth, lumbar support, armrests and recline controls.
◉
Workstation Compatibility
The chair should fit the user’s body measurements as well as the height and available space of the desk.
≈
Breathable Materials
Breathable seating materials can support greater comfort during extended work or study sessions.
★
Stable Construction
Review the five-star base, caster design, adjustment mechanisms and stated weight capacity before purchasing.
An ergonomic chair is not a medical treatment, but proper adjustability can help users create a more supportive workstation.
Who Is Eligible for the HBADA ID.me Discount?
HBADA currently lists exclusive savings for the following verified groups. Eligibility is determined through ID.me, and each status category may have its own verification requirements.
Eligible group
Current listed discount
Military members and veterans
6% OFF
First responders
6% OFF
Hospital employees
6% OFF
Medical providers
6% OFF
Nurses
6% OFF
Teachers
6% OFF
Students
5% OFF
How to Claim Your HBADA ID.me Discount
1
Choose Your Ergonomic Chair
Visit the HBADA US Store and select the chair that best matches your workspace, body measurements and adjustment requirements.
2
Start ID.me Verification
Open the HBADA ID.me Exclusive Discount page or use the ID.me verification option presented during checkout.
3
Sign In or Create an Account
Follow the ID.me instructions and select the status you want to verify. ID.me may request documentation depending on the selected eligibility category.
4
Complete Verification
Submit the requested information directly through ID.me. You do not need to email identification documents to HBADA for this discount.
5
Review Your Checkout Total
After successful verification, the eligible discount will be applied through the HBADA checkout process. Confirm the final total before completing payment.
Why Does HBADA Use ID.me?
ID.me is an independent identity-verification provider. It helps confirm eligibility without requiring HBADA customer service representatives to manually review identification documents.
The HBADA discount is a retailer-funded offer. It is not a federal program, government payment or employment benefit. HBADA determines the discount amount and applicable offer terms, while ID.me handles eligibility verification.
Visit the official HBADA ID.me Discount page to begin verification.
How to Choose the Right HBADA Chair
Before purchasing, compare the chair’s dimensions and adjustment range with your body and workstation.
Check the Seat Height
Your feet should rest securely on the floor or on a suitable footrest. The desk should allow your shoulders to remain relaxed.
Check the Seat Depth
The seat should support your thighs without pressing firmly against the backs of your knees.
Check the Lumbar Adjustment
Lumbar support should align with the natural inward curve of the lower back and suit the user’s torso length.
Check the Armrest Range
Armrests should support the forearms without forcing the shoulders upward or interfering with the desk.
Check Product Specifications
Review dimensions, adjustment ranges, stated weight capacity and product configuration before ordering.
Check Regional Terms
Specifications, prices, available versions and warranty coverage can vary by product and sales region.
Important HBADA ID.me Discount Terms
Please review these points before ordering
Eligibility must be confirmed through ID.me.
Discount percentages may differ by eligible group.
The offer has no cash value.
Multiple promotional codes generally cannot be stacked.
Displayed sale pricing and ID.me savings are subject to the checkout rules in effect at the time of purchase.
HBADA may update discount amounts, eligible products or program terms.
Confirm the final discount in the checkout total before payment.
HBADA ID.me Discount: Frequently Asked Questions
Does HBADA offer a military discount?
Yes. Eligible military members and veterans can currently receive 6% off after verifying their status through ID.me.
Does HBADA offer a first-responder discount?
Yes. Eligible first responders can currently receive 6% off through ID.me verification.
Is there a discount for nurses and healthcare professionals?
Yes. HBADA currently lists a 6% discount for eligible hospital employees, medical providers and nurses.
Does HBADA offer a teacher discount?
Yes. Eligible teachers can currently receive 6% off after completing ID.me verification.
Does HBADA offer a student discount?
Yes. Eligible students can currently receive 5% off through ID.me.
Do I need to email my identification to HBADA?
No. Verification is handled through ID.me. Follow the instructions presented on the HBADA ID.me page or during checkout.
Can the ID.me discount be combined with another coupon?
HBADA’s standard policy does not allow customers to stack multiple promotional codes. Some displayed sale prices may still work with an eligible discount when permitted by checkout. Confirm the final total before placing the order.
What should I do if ID.me verification does not work?
Check that your ID.me account information matches your eligibility documentation. For an ID.me verification problem, follow ID.me’s support process. For a problem applying the verified discount to an HBADA order, contact service@hbada.com.
Honor Your Service. Support Your Workday.
Your work supports other people. Your workspace should support you. Verify your eligibility through ID.me and receive the discount available for your eligible group.
Verify with ID.me and Save
Program References
HBADA ID.me Exclusive Discount
HBADA Discount & Promo Guide
Discount percentages and eligibility information were checked on September 1, 2026. Program terms may change. Confirm the current offer and final order total before purchase.
Sep 01, 2026
HBADA ID.me Discount for Military, Teachers & Healthcare
Exclusive Community Savings
Exclusive HBADA ergonomic chair discounts for military members, first responders, healthcare professionals, educators and students through ID.me.
✓ Quick Answer
Eligible military members, veterans, first responders, hospital employees, medical providers, nurses and teachers can currently receive 6% off HBADA ergonomic chairs through ID.me. Eligible students can receive 5% off. Complete ID.me verification and confirm the discount in your checkout total before placing the order.
What this guide covers
Better support for demanding workdays
Who is eligible
How to claim the discount
Why HBADA uses ID.me
How to choose the right chair
Important discount terms
Frequently asked questions
Verify your status and save
Better Support for Demanding Workdays
Military members, first responders, healthcare professionals, educators and students support our communities every day. HBADA is proud to recognize their contributions with exclusive savings on ergonomic office chairs through ID.me.
Whether you work long shifts, study for extended hours or spend your day supporting others, a properly adjustable chair can help you build a more comfortable workspace.
People working in healthcare, public safety, education and military-related roles often face demanding schedules. Some spend long periods completing reports, coordinating teams, studying, attending virtual meetings or handling administrative responsibilities.
A suitable ergonomic chair should do more than provide a place to sit. It should allow the user to adjust the chair to their body, desk and daily tasks.
↕
Personalized Adjustment
Look for adjustable seat height, seat depth, lumbar support, armrests and recline controls.
◉
Workstation Compatibility
The chair should fit the user’s body measurements as well as the height and available space of the desk.
≈
Breathable Materials
Breathable seating materials can support greater comfort during extended work or study sessions.
★
Stable Construction
Review the five-star base, caster design, adjustment mechanisms and stated weight capacity before purchasing.
An ergonomic chair is not a medical treatment, but proper adjustability can help users create a more supportive workstation.
Who Is Eligible for the HBADA ID.me Discount?
HBADA currently lists exclusive savings for the following verified groups. Eligibility is determined through ID.me, and each status category may have its own verification requirements.
Eligible group
Current listed discount
Military members and veterans
6% OFF
First responders
6% OFF
Hospital employees
6% OFF
Medical providers
6% OFF
Nurses
6% OFF
Teachers
6% OFF
Students
5% OFF
How to Claim Your HBADA ID.me Discount
1
Choose Your Ergonomic Chair
Visit the HBADA US Store and select the chair that best matches your workspace, body measurements and adjustment requirements.
2
Start ID.me Verification
Open the HBADA ID.me Exclusive Discount page or use the ID.me verification option presented during checkout.
3
Sign In or Create an Account
Follow the ID.me instructions and select the status you want to verify. ID.me may request documentation depending on the selected eligibility category.
4
Complete Verification
Submit the requested information directly through ID.me. You do not need to email identification documents to HBADA for this discount.
5
Review Your Checkout Total
After successful verification, the eligible discount will be applied through the HBADA checkout process. Confirm the final total before completing payment.
Why Does HBADA Use ID.me?
ID.me is an independent identity-verification provider. It helps confirm eligibility without requiring HBADA customer service representatives to manually review identification documents.
The HBADA discount is a retailer-funded offer. It is not a federal program, government payment or employment benefit. HBADA determines the discount amount and applicable offer terms, while ID.me handles eligibility verification.
Visit the official HBADA ID.me Discount page to begin verification.
How to Choose the Right HBADA Chair
Before purchasing, compare the chair’s dimensions and adjustment range with your body and workstation.
Check the Seat Height
Your feet should rest securely on the floor or on a suitable footrest. The desk should allow your shoulders to remain relaxed.
Check the Seat Depth
The seat should support your thighs without pressing firmly against the backs of your knees.
Check the Lumbar Adjustment
Lumbar support should align with the natural inward curve of the lower back and suit the user’s torso length.
Check the Armrest Range
Armrests should support the forearms without forcing the shoulders upward or interfering with the desk.
Check Product Specifications
Review dimensions, adjustment ranges, stated weight capacity and product configuration before ordering.
Check Regional Terms
Specifications, prices, available versions and warranty coverage can vary by product and sales region.
Important HBADA ID.me Discount Terms
Please review these points before ordering
Eligibility must be confirmed through ID.me.
Discount percentages may differ by eligible group.
The offer has no cash value.
Multiple promotional codes generally cannot be stacked.
Displayed sale pricing and ID.me savings are subject to the checkout rules in effect at the time of purchase.
HBADA may update discount amounts, eligible products or program terms.
Confirm the final discount in the checkout total before payment.
HBADA ID.me Discount: Frequently Asked Questions
Does HBADA offer a military discount?
Yes. Eligible military members and veterans can currently receive 6% off after verifying their status through ID.me.
Does HBADA offer a first-responder discount?
Yes. Eligible first responders can currently receive 6% off through ID.me verification.
Is there a discount for nurses and healthcare professionals?
Yes. HBADA currently lists a 6% discount for eligible hospital employees, medical providers and nurses.
Does HBADA offer a teacher discount?
Yes. Eligible teachers can currently receive 6% off after completing ID.me verification.
Does HBADA offer a student discount?
Yes. Eligible students can currently receive 5% off through ID.me.
Do I need to email my identification to HBADA?
No. Verification is handled through ID.me. Follow the instructions presented on the HBADA ID.me page or during checkout.
Can the ID.me discount be combined with another coupon?
HBADA’s standard policy does not allow customers to stack multiple promotional codes. Some displayed sale prices may still work with an eligible discount when permitted by checkout. Confirm the final total before placing the order.
What should I do if ID.me verification does not work?
Check that your ID.me account information matches your eligibility documentation. For an ID.me verification problem, follow ID.me’s support process. For a problem applying the verified discount to an HBADA order, contact service@hbada.com.
Honor Your Service. Support Your Workday.
Your work supports other people. Your workspace should support you. Verify your eligibility through ID.me and receive the discount available for your eligible group.
Verify with ID.me and Save
Program References
HBADA ID.me Exclusive Discount
HBADA Discount & Promo Guide
Discount percentages and eligibility information were checked on September 1, 2026. Program terms may change. Confirm the current offer and final order total before purchase.
Sep 01, 2026
 Office Chair Safety Checklist: Gas Lift, Base, Casters, and Fasteners
Quarterly Chair Care Guide
A practical inspection routine for finding loose, worn, or damaged chair components before they affect everyday stability.
✓ Quick Answer
Inspect your office chair every three months and whenever you notice a wobble, sinking seat, unusual noise, or damaged part. Check that the gas lift holds its height, the five-star base has no cracks, the casters roll securely, and all accessible fasteners remain tight. Never puncture, heat, or disassemble a pressurized gas lift.
What this guide covers
Why quarterly checks matter
Inspecting the gas lift
Checking the base and casters
Checking fasteners and mechanisms
Complete safety checklist
When to stop using the chair
HBADA component information
Frequently asked questions
Why check your office chair every quarter?
An ergonomic office chair contains moving and load-bearing components that experience normal wear. Bolts can loosen, caster stems can collect debris, and a gas lift can eventually lose its ability to hold the selected seat height.
A short inspection every three months helps identify these warning signs before they affect the chair’s stability or operation.
The UK Health and Safety Executive recommends assessing display-screen workstations and reviewing the setup when equipment, tasks, or user needs change. Your chair should be suitable for the workstation and kept in good working order.
Quarterly is a practical schedule for normal home-office use. A chair used intensively across multiple shifts may need more frequent checks. Inspect it immediately after moving or reassembling it, or whenever you notice a new lean, wobble, noise, or change in seat height.
How to inspect the office chair gas lift
The gas lift is the pressurized cylinder that controls seat height. A basic inspection does not require removing or opening it.
1
Test the seat height
Set the chair to a comfortable height and remain seated for several minutes. Check whether the seat stays in position.
2
Test the adjustment
Use the height lever normally. The seat should raise and lower without repeated sticking, sudden movement, or unusual resistance.
3
Look for visible damage
Check the exposed cylinder area for bending, corrosion, oil residue, or other obvious signs of damage.
4
Act on repeated sinking
If the seat continues to sink after checking the lever for obstruction, contact the manufacturer for the correct replacement process.
Important gas-lift safety warning
Never puncture, cut, heat, clamp, or disassemble a gas lift cylinder. It is a pressurized component. Follow the maintenance and replacement instructions for your exact chair model.
What does “Class 4 gas lift” mean?
Class 4 is a gas-lift specification used by many office-chair manufacturers. However, construction, testing documentation, and certification claims can differ between suppliers and markets. A Class 4 label alone should not be treated as proof that every cylinder has identical materials or certifications.
The current HBADA E3 Pro product page specifies an SGS-certified Class-4 gas lift. If that component requires service, use a replacement approved for the exact model instead of selecting a cylinder based only on its class label.
How to check the five-star base and casters
The base and casters support the chair during movement, reclining, and everyday position changes. Perform the first part of the inspection with the chair unloaded and placed on a clear, level floor.
Inspect the five-star base
Look for cracks, splits, bends, or deformation.
Pay particular attention to the points where each leg joins the center hub.
Confirm that all five points sit evenly on the floor.
Check for side-to-side rocking that is not caused by an uneven surface.
Stop using the chair if the base is visibly cracked or structurally damaged.
Inspect each caster
Roll the chair slowly and listen for scraping, sticking, or clicking.
Remove accessible hair, thread, dust, and grit from around each wheel.
Check that every caster remains seated firmly in its socket.
Look for cracked wheels, excessive wobble, or damaged caster stems.
Use model-compatible replacement casters when a wheel is damaged.
How to check fasteners and moving mechanisms
Loose fasteners are a common source of chair wobble, movement, and squeaking. Use the tool and tightening sequence supplied with the chair manual. Tighten fasteners until secure, but do not force or over-tighten them.
Check accessible bolts and screws around the seat, backrest, armrests, mechanism, and base connection.
Confirm that the armrests move and lock as intended.
Test the recline and tilt-lock functions without forcing the mechanism.
Investigate a new squeak or clicking sound instead of waiting for it to worsen.
Stop if an adjustment mechanism is jammed, bent, or unusually difficult to operate.
HBADA’s current maintenance guidance recommends checking and tightening bolts and screws every one to three months, depending on how intensively the chair is used. If hardware is missing, stripped, or damaged, request the correct replacement rather than installing an unverified fastener.
The complete quarterly office chair safety checklist
Use this table during each inspection. If a load-bearing component is cracked, bent, or unstable, stop using the chair until the correct repair or replacement has been arranged.
Chair part
What to inspect
Action if the check fails
Gas lift
Holds the selected height, adjusts normally, and has no visible damage or leakage
Check the lever for obstruction and contact the manufacturer if the chair continues to sink
Five-star base
No cracks, bends, deformation, or uneven contact with the floor
Stop using the chair if the base is cracked or unstable
Casters
Roll freely, remain firmly seated, and are clear of debris
Clean the wheel or install a model-compatible replacement
Seat and base fasteners
Secure, correctly seated, and free from stripped threads
Tighten according to the manual or request replacement hardware
Backrest and armrests
Connections remain stable and adjustments move and lock normally
Stop using the affected adjustment and arrange service if it remains loose
Recline and tilt lock
Engages, releases, and holds without sticking or unexpected movement
Check for an obstruction and contact support if the mechanism does not operate correctly
What should you never do with an office chair?
Never puncture, heat, modify, or disassemble the gas cylinder.
Never continue using a chair with a cracked or unstable base.
Never stand on the chair or use it as a step stool or ladder.
Never sit on the armrests or allow more than one person to use the chair.
Never force a jammed recline, height, headrest, or armrest mechanism.
Never exceed the load limit specified for the exact chair model.
Stop using the chair if you find a cracked base, severely loose component, caster that will not remain seated, visibly damaged cylinder, or recline mechanism that cannot hold securely.
HBADA chair components and support information
When comparing ergonomic office chairs, look beyond comfort features. Review the stated load capacity, gas-lift specification, base material, caster design, warranty terms, and availability of model-specific support.
Model
Current product specifications
Current listed coverage
HBADA E3 Pro
SGS-certified Class-4 gas lift, steel base, PA+PU casters, and maximum load listed as 330 lb / 150 kg
Five-year coverage listed for core load-bearing components, including the base, gas lift, and casters
HBADA X7
Five-star base, maximum load listed as 330 lb / 150 kg, and BIFMA X5.1 certification stated on the product page
Five-year coverage listed for the five-star base, gas lift, and casters
Specifications and warranty terms can vary by model, version, and sales region. Check the product page and documentation supplied with your chair before relying on a specification.
When should you contact support?
Contact the manufacturer when a gas lift repeatedly sinks, a structural part appears damaged, a mechanism cannot lock, or the required replacement part is unclear. For a chair under warranty, contact support before attempting to replace a safety-related component.
For model-specific setup, maintenance, and troubleshooting instructions, visit the HBADA Assembly, Maintenance & Troubleshooting guide.
Office chair safety: frequently asked questions
How often should I inspect my office chair?
For a chair used every day, perform a basic inspection about every three months. Check it sooner if you notice a new wobble, squeak, sinking seat, loose part, or change in how an adjustment works. Chairs used intensively may require monthly fastener checks.
Why does my office chair keep sinking?
A chair that gradually lowers may have a worn or faulty gas lift. First check that the height lever is fully released and that nothing is obstructing the mechanism. If the seat continues to sink, contact the manufacturer rather than opening the pressurized cylinder.
Are office chair gas lifts dangerous?
Gas lifts are designed for normal chair operation, but they are pressurized components. Do not puncture, disassemble, modify, or expose one to heat. A visibly damaged or failing gas lift should be handled through the manufacturer’s recommended service process.
How do I know if an office chair base is unsafe?
A visible crack, bend, uneven stance, persistent wobble, or damaged caster socket is a reason to stop using the chair. Inspect the points where each base leg meets the center hub, as these areas carry significant load.
Can I replace office chair parts myself?
Follow the manual and warranty terms for your exact model. Casters and some fasteners may be user-serviceable, but replacement parts must be compatible with the chair. Contact support before replacing a gas lift, base, or other safety-related component.
Does an ergonomic chair prevent back pain?
An adjustable chair can support a better workstation setup, but it is not a medical treatment and cannot guarantee pain prevention. Adjust the complete workstation to your needs, change position regularly, and seek qualified advice for persistent pain or injury.
Make chair inspection part of your routine
Set a quarterly reminder, act promptly on damage or instability, and use the correct support process for replacement parts. A few minutes of routine inspection can help keep your chair operating as intended.
Explore Ergonomic Office Chairs
Sources and product references
UK Health and Safety Executive: Working with display screen equipment
HBADA: Assembly, Maintenance & Troubleshooting
HBADA E3 Pro Ergonomic Office Chair specifications
HBADA X7 Smart Ergonomic Chair specifications
Product specifications and warranty terms referenced in this article were checked on September 1, 2026. Confirm the current product page and regional policy before purchase or service.
Aug 31, 2026
Office Chair Safety Checklist: Gas Lift, Base, Casters, and Fasteners
Quarterly Chair Care Guide
A practical inspection routine for finding loose, worn, or damaged chair components before they affect everyday stability.
✓ Quick Answer
Inspect your office chair every three months and whenever you notice a wobble, sinking seat, unusual noise, or damaged part. Check that the gas lift holds its height, the five-star base has no cracks, the casters roll securely, and all accessible fasteners remain tight. Never puncture, heat, or disassemble a pressurized gas lift.
What this guide covers
Why quarterly checks matter
Inspecting the gas lift
Checking the base and casters
Checking fasteners and mechanisms
Complete safety checklist
When to stop using the chair
HBADA component information
Frequently asked questions
Why check your office chair every quarter?
An ergonomic office chair contains moving and load-bearing components that experience normal wear. Bolts can loosen, caster stems can collect debris, and a gas lift can eventually lose its ability to hold the selected seat height.
A short inspection every three months helps identify these warning signs before they affect the chair’s stability or operation.
The UK Health and Safety Executive recommends assessing display-screen workstations and reviewing the setup when equipment, tasks, or user needs change. Your chair should be suitable for the workstation and kept in good working order.
Quarterly is a practical schedule for normal home-office use. A chair used intensively across multiple shifts may need more frequent checks. Inspect it immediately after moving or reassembling it, or whenever you notice a new lean, wobble, noise, or change in seat height.
How to inspect the office chair gas lift
The gas lift is the pressurized cylinder that controls seat height. A basic inspection does not require removing or opening it.
1
Test the seat height
Set the chair to a comfortable height and remain seated for several minutes. Check whether the seat stays in position.
2
Test the adjustment
Use the height lever normally. The seat should raise and lower without repeated sticking, sudden movement, or unusual resistance.
3
Look for visible damage
Check the exposed cylinder area for bending, corrosion, oil residue, or other obvious signs of damage.
4
Act on repeated sinking
If the seat continues to sink after checking the lever for obstruction, contact the manufacturer for the correct replacement process.
Important gas-lift safety warning
Never puncture, cut, heat, clamp, or disassemble a gas lift cylinder. It is a pressurized component. Follow the maintenance and replacement instructions for your exact chair model.
What does “Class 4 gas lift” mean?
Class 4 is a gas-lift specification used by many office-chair manufacturers. However, construction, testing documentation, and certification claims can differ between suppliers and markets. A Class 4 label alone should not be treated as proof that every cylinder has identical materials or certifications.
The current HBADA E3 Pro product page specifies an SGS-certified Class-4 gas lift. If that component requires service, use a replacement approved for the exact model instead of selecting a cylinder based only on its class label.
How to check the five-star base and casters
The base and casters support the chair during movement, reclining, and everyday position changes. Perform the first part of the inspection with the chair unloaded and placed on a clear, level floor.
Inspect the five-star base
Look for cracks, splits, bends, or deformation.
Pay particular attention to the points where each leg joins the center hub.
Confirm that all five points sit evenly on the floor.
Check for side-to-side rocking that is not caused by an uneven surface.
Stop using the chair if the base is visibly cracked or structurally damaged.
Inspect each caster
Roll the chair slowly and listen for scraping, sticking, or clicking.
Remove accessible hair, thread, dust, and grit from around each wheel.
Check that every caster remains seated firmly in its socket.
Look for cracked wheels, excessive wobble, or damaged caster stems.
Use model-compatible replacement casters when a wheel is damaged.
How to check fasteners and moving mechanisms
Loose fasteners are a common source of chair wobble, movement, and squeaking. Use the tool and tightening sequence supplied with the chair manual. Tighten fasteners until secure, but do not force or over-tighten them.
Check accessible bolts and screws around the seat, backrest, armrests, mechanism, and base connection.
Confirm that the armrests move and lock as intended.
Test the recline and tilt-lock functions without forcing the mechanism.
Investigate a new squeak or clicking sound instead of waiting for it to worsen.
Stop if an adjustment mechanism is jammed, bent, or unusually difficult to operate.
HBADA’s current maintenance guidance recommends checking and tightening bolts and screws every one to three months, depending on how intensively the chair is used. If hardware is missing, stripped, or damaged, request the correct replacement rather than installing an unverified fastener.
The complete quarterly office chair safety checklist
Use this table during each inspection. If a load-bearing component is cracked, bent, or unstable, stop using the chair until the correct repair or replacement has been arranged.
Chair part
What to inspect
Action if the check fails
Gas lift
Holds the selected height, adjusts normally, and has no visible damage or leakage
Check the lever for obstruction and contact the manufacturer if the chair continues to sink
Five-star base
No cracks, bends, deformation, or uneven contact with the floor
Stop using the chair if the base is cracked or unstable
Casters
Roll freely, remain firmly seated, and are clear of debris
Clean the wheel or install a model-compatible replacement
Seat and base fasteners
Secure, correctly seated, and free from stripped threads
Tighten according to the manual or request replacement hardware
Backrest and armrests
Connections remain stable and adjustments move and lock normally
Stop using the affected adjustment and arrange service if it remains loose
Recline and tilt lock
Engages, releases, and holds without sticking or unexpected movement
Check for an obstruction and contact support if the mechanism does not operate correctly
What should you never do with an office chair?
Never puncture, heat, modify, or disassemble the gas cylinder.
Never continue using a chair with a cracked or unstable base.
Never stand on the chair or use it as a step stool or ladder.
Never sit on the armrests or allow more than one person to use the chair.
Never force a jammed recline, height, headrest, or armrest mechanism.
Never exceed the load limit specified for the exact chair model.
Stop using the chair if you find a cracked base, severely loose component, caster that will not remain seated, visibly damaged cylinder, or recline mechanism that cannot hold securely.
HBADA chair components and support information
When comparing ergonomic office chairs, look beyond comfort features. Review the stated load capacity, gas-lift specification, base material, caster design, warranty terms, and availability of model-specific support.
Model
Current product specifications
Current listed coverage
HBADA E3 Pro
SGS-certified Class-4 gas lift, steel base, PA+PU casters, and maximum load listed as 330 lb / 150 kg
Five-year coverage listed for core load-bearing components, including the base, gas lift, and casters
HBADA X7
Five-star base, maximum load listed as 330 lb / 150 kg, and BIFMA X5.1 certification stated on the product page
Five-year coverage listed for the five-star base, gas lift, and casters
Specifications and warranty terms can vary by model, version, and sales region. Check the product page and documentation supplied with your chair before relying on a specification.
When should you contact support?
Contact the manufacturer when a gas lift repeatedly sinks, a structural part appears damaged, a mechanism cannot lock, or the required replacement part is unclear. For a chair under warranty, contact support before attempting to replace a safety-related component.
For model-specific setup, maintenance, and troubleshooting instructions, visit the HBADA Assembly, Maintenance & Troubleshooting guide.
Office chair safety: frequently asked questions
How often should I inspect my office chair?
For a chair used every day, perform a basic inspection about every three months. Check it sooner if you notice a new wobble, squeak, sinking seat, loose part, or change in how an adjustment works. Chairs used intensively may require monthly fastener checks.
Why does my office chair keep sinking?
A chair that gradually lowers may have a worn or faulty gas lift. First check that the height lever is fully released and that nothing is obstructing the mechanism. If the seat continues to sink, contact the manufacturer rather than opening the pressurized cylinder.
Are office chair gas lifts dangerous?
Gas lifts are designed for normal chair operation, but they are pressurized components. Do not puncture, disassemble, modify, or expose one to heat. A visibly damaged or failing gas lift should be handled through the manufacturer’s recommended service process.
How do I know if an office chair base is unsafe?
A visible crack, bend, uneven stance, persistent wobble, or damaged caster socket is a reason to stop using the chair. Inspect the points where each base leg meets the center hub, as these areas carry significant load.
Can I replace office chair parts myself?
Follow the manual and warranty terms for your exact model. Casters and some fasteners may be user-serviceable, but replacement parts must be compatible with the chair. Contact support before replacing a gas lift, base, or other safety-related component.
Does an ergonomic chair prevent back pain?
An adjustable chair can support a better workstation setup, but it is not a medical treatment and cannot guarantee pain prevention. Adjust the complete workstation to your needs, change position regularly, and seek qualified advice for persistent pain or injury.
Make chair inspection part of your routine
Set a quarterly reminder, act promptly on damage or instability, and use the correct support process for replacement parts. A few minutes of routine inspection can help keep your chair operating as intended.
Explore Ergonomic Office Chairs
Sources and product references
UK Health and Safety Executive: Working with display screen equipment
HBADA: Assembly, Maintenance & Troubleshooting
HBADA E3 Pro Ergonomic Office Chair specifications
HBADA X7 Smart Ergonomic Chair specifications
Product specifications and warranty terms referenced in this article were checked on September 1, 2026. Confirm the current product page and regional policy before purchase or service.
Aug 31, 2026
 Which HBADA Ergonomic Office Chair Should You Buy? 2026 Comparison
Quick answer: Choose the HBADA X7 Smart if you want automatic lumbar tracking, massage, heating and ventilation. Choose the E3 Pro 2026 for extensive mechanical adjustment without electronics. Choose the E3 Air 2026 for a more accessible everyday chair. Consider the X7 Air when you want X7 technology with a lighter nylon backrest frame.
The right HBADA ergonomic office chair depends on how long you sit, how much control you want and which features you will actually use. A flagship chair is not automatically the best choice for every desk.
Start with your working habits, body measurements and budget. Then compare the individual model specifications instead of choosing by price or product name alone.
Table of Contents
How to choose an HBADA chair
What the 2026 range includes
Which model fits your needs
X7 Smart vs E3 Pro
Five-step buying process
Final recommendations
Frequently asked questions
How Should You Choose an HBADA Ergonomic Office Chair?
Start with how you work rather than the longest feature list. Four questions narrow the range quickly:
How many hours do you normally sit each day?
Do you want automatic lumbar tracking or manual adjustment?
Will you use features such as massage, heating, ventilation or a footrest?
Do the seat, backrest and height ranges match your body?
People who change position frequently may value responsive lumbar and armrest adjustment. A shared office chair needs broad, easy-to-reset controls. A chair used mainly for short home-office sessions may not need powered comfort features.
An adjustable chair may help you maintain a more comfortable working position, but it cannot replace movement, breaks or medical care.
What Does the 2026 HBADA Range Include?
The X7 Smart Series
The X7 family is HBADA's powered smart-chair range.
HBADA X7 Smart: AI lumbar tracking, bionic massage, heating, seat ventilation, 720° armrests and a pull-out footrest.
X7 Air: Uses the same core ergonomic and smart systems as the standard X7, with a lighter reinforced nylon backrest frame instead of the X7's aluminum-alloy frame.
X7 Prestige: Adds an aluminum support structure, foldable lumbar wings and Alcantara® performance textiles. Availability may be limited by its launch or pre-order schedule.
Browse the current HBADA X7 Series before ordering because model availability and fulfillment dates can change.
The E3 Series
The E3 family focuses on mechanical adjustment without powered lumbar tracking.
E3 Pro 2026: Three-zone adaptive lumbar support, 80 mm backrest lift, 60 mm independent lumbar lift, 720° armrests and an adjustable seat depth.
E3 Air 2026: Three-zone lumbar support, breathable mesh, adjustable headrest and multi-position armrests at a lower price tier.
E3 Ultra: Aluminum-alloy construction, extensive adjustment and a standard footrest. It is currently presented as a final-clearance model, so future availability is not guaranteed.
See the current HBADA E3 Series for available colors, configurations and footrest options.
Which HBADA Model Fits Your Needs?
Priority
Recommended model
Why it fits
Hands-off lumbar adjustment
X7 Smart
Powered lumbar tracking responds as your position changes
Extensive manual control
E3 Pro 2026
Independent backrest, lumbar, seat and armrest adjustment
Everyday home-office value
E3 Air 2026
Core ergonomic adjustment at a lower price tier
Smart functions with a lighter frame
X7 Air
X7 technology with a reinforced nylon backrest frame
Premium material finish
X7 Prestige
Alcantara® textiles and premium aluminum structure
Clearance model with a standard footrest
E3 Ultra
Extensive adjustment, subject to remaining inventory
HBADA X7 Smart vs E3 Pro 2026
These are two of the most frequently compared HBADA chairs, but they solve the adjustment problem differently.
Feature
X7 Smart
E3 Pro 2026
Lumbar system
Powered three-zone tracking
Mechanical three-zone adaptive support
Lumbar adjustment
50 mm powered front-to-back travel and 45 mm vertical travel
60 mm independent lift plus adaptive depth and side wings
Seat depth
50 mm slide
50 mm slide
Recline
Up to 140°
Up to 140°
Footrest
Integrated
Available on selected configurations
Powered features
Massage, heating and ventilation
None
Recommended height
150–195 cm
155–195 cm
Maximum load
150 kg / 330 lb
150 kg / 330 lb
Choose the X7 Smart if you want the chair to manage lumbar movement and you expect to use its powered comfort functions. Choose the E3 Pro 2026 if you prefer to set the support yourself and do not want a battery or electronic system.
How to Pick Your Chair in Five Steps
Estimate your normal sitting time. Do not base the decision on your longest occasional workday.
Set a realistic budget. Include only features you expect to use regularly.
Choose automatic or mechanical support. X7 provides powered tracking; E3 focuses on manual adjustment.
Check special requirements. Confirm footrest configuration, material, available colors and desk clearance.
Measure before ordering. Compare your leg, torso and hip measurements with the chair's current product specifications.
Which HBADA Chair Should You Buy?
Best for powered support and comfort technology: Choose the X7 Smart if you want automatic lumbar tracking, massage, heating, ventilation and a built-in footrest.
Best for mechanical adjustment: Choose the E3 Pro 2026 for independent lumbar, backrest, seat and armrest control without electronics.
Best everyday value: Choose the E3 Air 2026 when you need the main ergonomic adjustments but do not need flagship technology.
Best premium finish: Consider the X7 Prestige if Alcantara® materials and its premium aluminum construction matter to you. Check the current fulfillment status before ordering.
Still deciding? Browse the complete HBADA office chair collection and confirm the current price, configuration and availability on the product page.
Limitations and Return Considerations
Specifications help determine dimensional compatibility but cannot guarantee comfort.
Prices, availability, model configurations and promotional offers can change.
Certification and testing claims should be checked on the individual product page.
Keep the original box and protective packaging during the return window.
HBADA US currently accepts eligible return requests within 30 days of delivery, subject to the condition of the chair, the reason for return and the applicable shipping costs. Review the current US return guidance before assembling or returning a chair.
If you experience severe, persistent or radiating pain, numbness or weakness, consult a qualified healthcare professional. A chair is not a medical treatment.
Conclusion
There is no single HBADA chair that is best for everyone. The X7 Smart is the strongest option for powered lumbar tracking and comfort technology. The E3 Pro 2026 provides extensive mechanical control. The E3 Air 2026 covers everyday home-office needs at a more accessible level.
Choose by working pattern and body measurements, then confirm the exact configuration on the live product page.
Frequently Asked Questions
Which HBADA chair is best for long workdays?
The X7 Smart and E3 Pro 2026 provide the broadest support systems in the current range. Choose the X7 for powered lumbar tracking and comfort features, or the E3 Pro for mechanical adjustment without electronics.
What is the main difference between the X7 Smart and E3 Pro?
The X7 Smart adjusts lumbar support through a powered tracking system and includes massage, heating and ventilation. The E3 Pro uses a mechanical three-zone system that the user adjusts directly.
Which models offer a footrest?
The X7 Smart includes a pull-out footrest. E3 Pro and E3 Air are offered in selected configurations with or without a footrest. The E3 Ultra includes one as standard on the current clearance model.
Can I judge fit from height alone?
No. Recommended height is only a shortlist. Seat height, seat depth, lumbar position, torso length and hip width also affect fit.
Can I return a chair if it does not fit?
Eligible US returns may be requested within 30 days of delivery, but product condition, packaging and return-shipping costs matter. Check the current return policy before ordering.
Sources
HBADA X7 Smart product specifications
HBADA E3 Pro 2026 product specifications
HBADA E3 Air 2026 product page
HBADA E3 Ultra product page
HBADA X7 Prestige product page
HSE: Working with display screen equipment
Aug 30, 2026
Which HBADA Ergonomic Office Chair Should You Buy? 2026 Comparison
Quick answer: Choose the HBADA X7 Smart if you want automatic lumbar tracking, massage, heating and ventilation. Choose the E3 Pro 2026 for extensive mechanical adjustment without electronics. Choose the E3 Air 2026 for a more accessible everyday chair. Consider the X7 Air when you want X7 technology with a lighter nylon backrest frame.
The right HBADA ergonomic office chair depends on how long you sit, how much control you want and which features you will actually use. A flagship chair is not automatically the best choice for every desk.
Start with your working habits, body measurements and budget. Then compare the individual model specifications instead of choosing by price or product name alone.
Table of Contents
How to choose an HBADA chair
What the 2026 range includes
Which model fits your needs
X7 Smart vs E3 Pro
Five-step buying process
Final recommendations
Frequently asked questions
How Should You Choose an HBADA Ergonomic Office Chair?
Start with how you work rather than the longest feature list. Four questions narrow the range quickly:
How many hours do you normally sit each day?
Do you want automatic lumbar tracking or manual adjustment?
Will you use features such as massage, heating, ventilation or a footrest?
Do the seat, backrest and height ranges match your body?
People who change position frequently may value responsive lumbar and armrest adjustment. A shared office chair needs broad, easy-to-reset controls. A chair used mainly for short home-office sessions may not need powered comfort features.
An adjustable chair may help you maintain a more comfortable working position, but it cannot replace movement, breaks or medical care.
What Does the 2026 HBADA Range Include?
The X7 Smart Series
The X7 family is HBADA's powered smart-chair range.
HBADA X7 Smart: AI lumbar tracking, bionic massage, heating, seat ventilation, 720° armrests and a pull-out footrest.
X7 Air: Uses the same core ergonomic and smart systems as the standard X7, with a lighter reinforced nylon backrest frame instead of the X7's aluminum-alloy frame.
X7 Prestige: Adds an aluminum support structure, foldable lumbar wings and Alcantara® performance textiles. Availability may be limited by its launch or pre-order schedule.
Browse the current HBADA X7 Series before ordering because model availability and fulfillment dates can change.
The E3 Series
The E3 family focuses on mechanical adjustment without powered lumbar tracking.
E3 Pro 2026: Three-zone adaptive lumbar support, 80 mm backrest lift, 60 mm independent lumbar lift, 720° armrests and an adjustable seat depth.
E3 Air 2026: Three-zone lumbar support, breathable mesh, adjustable headrest and multi-position armrests at a lower price tier.
E3 Ultra: Aluminum-alloy construction, extensive adjustment and a standard footrest. It is currently presented as a final-clearance model, so future availability is not guaranteed.
See the current HBADA E3 Series for available colors, configurations and footrest options.
Which HBADA Model Fits Your Needs?
Priority
Recommended model
Why it fits
Hands-off lumbar adjustment
X7 Smart
Powered lumbar tracking responds as your position changes
Extensive manual control
E3 Pro 2026
Independent backrest, lumbar, seat and armrest adjustment
Everyday home-office value
E3 Air 2026
Core ergonomic adjustment at a lower price tier
Smart functions with a lighter frame
X7 Air
X7 technology with a reinforced nylon backrest frame
Premium material finish
X7 Prestige
Alcantara® textiles and premium aluminum structure
Clearance model with a standard footrest
E3 Ultra
Extensive adjustment, subject to remaining inventory
HBADA X7 Smart vs E3 Pro 2026
These are two of the most frequently compared HBADA chairs, but they solve the adjustment problem differently.
Feature
X7 Smart
E3 Pro 2026
Lumbar system
Powered three-zone tracking
Mechanical three-zone adaptive support
Lumbar adjustment
50 mm powered front-to-back travel and 45 mm vertical travel
60 mm independent lift plus adaptive depth and side wings
Seat depth
50 mm slide
50 mm slide
Recline
Up to 140°
Up to 140°
Footrest
Integrated
Available on selected configurations
Powered features
Massage, heating and ventilation
None
Recommended height
150–195 cm
155–195 cm
Maximum load
150 kg / 330 lb
150 kg / 330 lb
Choose the X7 Smart if you want the chair to manage lumbar movement and you expect to use its powered comfort functions. Choose the E3 Pro 2026 if you prefer to set the support yourself and do not want a battery or electronic system.
How to Pick Your Chair in Five Steps
Estimate your normal sitting time. Do not base the decision on your longest occasional workday.
Set a realistic budget. Include only features you expect to use regularly.
Choose automatic or mechanical support. X7 provides powered tracking; E3 focuses on manual adjustment.
Check special requirements. Confirm footrest configuration, material, available colors and desk clearance.
Measure before ordering. Compare your leg, torso and hip measurements with the chair's current product specifications.
Which HBADA Chair Should You Buy?
Best for powered support and comfort technology: Choose the X7 Smart if you want automatic lumbar tracking, massage, heating, ventilation and a built-in footrest.
Best for mechanical adjustment: Choose the E3 Pro 2026 for independent lumbar, backrest, seat and armrest control without electronics.
Best everyday value: Choose the E3 Air 2026 when you need the main ergonomic adjustments but do not need flagship technology.
Best premium finish: Consider the X7 Prestige if Alcantara® materials and its premium aluminum construction matter to you. Check the current fulfillment status before ordering.
Still deciding? Browse the complete HBADA office chair collection and confirm the current price, configuration and availability on the product page.
Limitations and Return Considerations
Specifications help determine dimensional compatibility but cannot guarantee comfort.
Prices, availability, model configurations and promotional offers can change.
Certification and testing claims should be checked on the individual product page.
Keep the original box and protective packaging during the return window.
HBADA US currently accepts eligible return requests within 30 days of delivery, subject to the condition of the chair, the reason for return and the applicable shipping costs. Review the current US return guidance before assembling or returning a chair.
If you experience severe, persistent or radiating pain, numbness or weakness, consult a qualified healthcare professional. A chair is not a medical treatment.
Conclusion
There is no single HBADA chair that is best for everyone. The X7 Smart is the strongest option for powered lumbar tracking and comfort technology. The E3 Pro 2026 provides extensive mechanical control. The E3 Air 2026 covers everyday home-office needs at a more accessible level.
Choose by working pattern and body measurements, then confirm the exact configuration on the live product page.
Frequently Asked Questions
Which HBADA chair is best for long workdays?
The X7 Smart and E3 Pro 2026 provide the broadest support systems in the current range. Choose the X7 for powered lumbar tracking and comfort features, or the E3 Pro for mechanical adjustment without electronics.
What is the main difference between the X7 Smart and E3 Pro?
The X7 Smart adjusts lumbar support through a powered tracking system and includes massage, heating and ventilation. The E3 Pro uses a mechanical three-zone system that the user adjusts directly.
Which models offer a footrest?
The X7 Smart includes a pull-out footrest. E3 Pro and E3 Air are offered in selected configurations with or without a footrest. The E3 Ultra includes one as standard on the current clearance model.
Can I judge fit from height alone?
No. Recommended height is only a shortlist. Seat height, seat depth, lumbar position, torso length and hip width also affect fit.
Can I return a chair if it does not fit?
Eligible US returns may be requested within 30 days of delivery, but product condition, packaging and return-shipping costs matter. Check the current return policy before ordering.
Sources
HBADA X7 Smart product specifications
HBADA E3 Pro 2026 product specifications
HBADA E3 Air 2026 product page
HBADA E3 Ultra product page
HBADA X7 Prestige product page
HSE: Working with display screen equipment
Aug 30, 2026
 Best HBADA Office Chairs for Long Hours and Back Pain Relief (2026)
Updated August 2026
Eight hours at a desk has a way of exposing every weakness in a chair. A backrest that felt acceptable in the morning may feel unsupportive by mid-afternoon, while poorly positioned armrests can leave your shoulders doing more work than they should.
Quick Answer There is no single best office chair for every long-hour user. The HBADA X7 is the strongest match for people who want automatically adjusting lumbar support. The E3 Pro focuses on precise, multi-zone lower-back adjustment. The E3 Ultra is better suited to users who value a footrest and deeper recovery breaks, while the E3 Air covers the essential ergonomic adjustments at a more accessible level.
This guide compares the main differences without assuming that the most expensive or feature-heavy model is automatically the right one. For a broader buying checklist, see our ergonomic office chair buying guide .
Table of Contents
What matters during long workdays?
Quick model comparison
HBADA X7: automatic lumbar adjustment
HBADA E3 Pro: targeted lumbar adjustment
HBADA E3 Ultra: recline and recovery breaks
HBADA E3 Air: practical everyday support
How to choose the right model
How to set up your chair
When to seek medical advice
Frequently asked questions
What Matters During Long Workdays?
The word “ergonomic” on its own does not tell you whether a chair will fit your body or remain comfortable throughout the day. Fit and adjustability matter more than the label.
OSHA’s computer workstation guidance recommends looking at the backrest, seat, armrests and base together. That is a useful way to assess a chair because one adjustment cannot compensate for an otherwise poor fit.
Lumbar support: It should meet the natural curve of your lower back without feeling like a hard point pressing into it.
Seat height and depth: Your feet should be supported, and the seat edge should not press into the backs of your knees.
Recline: Changing position during the day is generally more useful than trying to hold one “perfect” posture for hours.
Armrest adjustment: Your forearms should be supported without forcing your shoulders upward.
Breathability: Mesh and ventilated surfaces can make long sessions more comfortable in warmer rooms.
Stable construction: The chair should feel secure during movement, recline and everyday use.
HBADA Chair Comparison for Long Hours
Model
Best suited to
Lumbar approach
Break and comfort features
Consider before buying
HBADA X7
Users who want support that adjusts with less manual input
Smart lumbar tracking and automatic adjustment
Ventilated seat, massage functions and broad adjustability
More functions mean more controls and a higher price tier
HBADA E3 Pro
Users who want detailed mechanical lumbar adjustment
Three-zone adaptive lumbar support
Multi-position recline and highly adjustable armrests
Lumbar settings still need to be adjusted to the individual user
HBADA E3 Ultra
Users who take reclined recovery breaks during the day
Three-zone elastic lumbar support
Deep recline and an integrated footrest
The footrest is useful for breaks, not a substitute for regular movement
HBADA E3 Air
Users who want the main ergonomic adjustments without smart functions
Adjustable lumbar support
Breathable mesh and adjustable upper-body support
Offers fewer automated and recovery-focused features
HBADA X7: Automatic Lumbar Adjustment
Most people do not remain in one position for an entire workday. They lean forward to type, turn during calls and recline while reading. This is where the X7’s smart lumbar system is most relevant: it is designed to follow changes in sitting position instead of relying only on one manually fixed setting.
The model also combines a ventilated seat, massage functions, adjustable head support and 720° armrests. Those features make the X7 particularly relevant for long desk sessions in which cooling, arm positioning and changes of posture all matter.
The X7 is not automatically the correct chair for everyone. Someone who prefers simple mechanical controls may not need its additional technology. Users should also check the current dimensions, recommended height range and available configuration before ordering.
View the HBADA X7
Owners can also consult the HBADA X7 charging and battery guide for information about its powered functions.
HBADA E3 Pro: Targeted Lumbar Adjustment
The E3 Pro takes a more mechanical approach. Its three-zone lumbar system is designed to support the centre and sides of the lower back, allowing users to fine-tune the contact rather than depend on a single lumbar pad.
This can be useful for someone who already knows where they prefer more or less support. The chair also offers multi-position recline and extensively adjustable armrests, helping it adapt between typing, reading and relaxed sitting.
It is better to describe the E3 Pro as a chair for targeted lumbar support, not as a treatment for back pain. The right setting still depends on the user’s height, body proportions, desk height and sitting habits.
View the HBADA E3 Pro
HBADA E3 Ultra: Recline and Recovery Breaks
A long workday should not mean staying upright and motionless for eight hours. The E3 Ultra is the more break-oriented option in this comparison, combining adjustable lumbar support with deeper recline and an integrated footrest.
That setup is useful for short periods of reading, taking a call or reclining between focused tasks. It does not replace standing, walking or changing position, but it gives users another supported posture when they need a brief pause.
Because the E3 Ultra is available in different configurations, check the selected model, colour and footrest option on the product page before purchasing.
View the HBADA E3 Ultra
HBADA E3 Air: Practical Everyday Support
Not every buyer needs automatic lumbar tracking, massage or a footrest. The E3 Air is intended for people who mainly want an adjustable, breathable office chair for everyday desk work.
Its mesh construction helps with airflow, while the lumbar, headrest and armrest adjustments cover the areas most users need to configure. It has fewer advanced functions than the X7 and fewer break-focused features than the E3 Ultra, but that simpler design may be exactly what some home offices require.
View the HBADA E3 Air
How to Choose the Right Model
Start with the problem you are trying to solve rather than the longest feature list.
Choose the X7 if you want lumbar support that responds automatically as your position changes.
Choose the E3 Pro if you prefer detailed mechanical control over lower-back support.
Choose the E3 Ultra if a footrest and supported reclining breaks are important to you.
Choose the E3 Air if you want breathable, adjustable everyday seating without paying for functions you may not use.
Before deciding, compare seat height, seat depth, overall dimensions, weight capacity and recommended user height. Those measurements are often more important than small differences in the number of adjustment settings.
How to Set Up an Office Chair for Long Hours
Sit fully against the backrest before positioning the lumbar support.
Adjust the seat so your feet rest flat on the floor or on a stable footrest.
Leave a small gap between the seat edge and the backs of your knees.
Position the armrests so your shoulders remain relaxed and your elbows stay close to your body.
Use a slight recline when comfortable instead of forcing yourself to remain perfectly upright.
Recheck the settings when your task changes, especially when moving between typing, reading and reclining.
Stand up and move regularly. No chair removes the need for movement.
Maintenance also affects long-term comfort. A worn seat, loose armrest or unstable mechanism may change how the chair supports you. Our guide to how long an office chair lasts explains what to monitor over time.
Health note: An appropriately fitted chair may help reduce strain associated with poor workstation positioning, but an ergonomic chair does not diagnose, treat or cure back pain. Persistent, severe, worsening or radiating pain should be discussed with a qualified doctor or physiotherapist.
Frequently Asked Questions
Which HBADA chair is best for long working hours?
The X7 is the strongest match for users who want automatic lumbar adjustment. The E3 Pro may be more suitable for people who prefer detailed mechanical control, while the E3 Air provides a simpler everyday option. Body fit should remain the deciding factor.
Which HBADA chair offers the most targeted lumbar adjustment?
The E3 Pro uses a three-zone adaptive lumbar system intended to provide adjustable support across the centre and sides of the lower back.
Is the HBADA X7 worth considering for an eight-hour workday?
It may be a good fit if you value automatic lumbar tracking, ventilation and other powered comfort functions. Buyers who prefer a simpler chair may find that a mechanically adjustable E3 model meets their needs.
Which HBADA ergonomic office chair includes a footrest?
The E3 Ultra is available with an integrated footrest and is the most break-oriented option in this comparison. Always verify the selected variant because configurations can differ.
Do I need an expensive chair for long hours?
Not necessarily. Correct dimensions and useful adjustments matter more than price alone. The E3 Air covers the main ergonomic fundamentals for users who do not need smart tracking, massage or an integrated footrest.
Can an ergonomic chair fix back pain?
No. A properly adjusted chair may help reduce strain and support a more comfortable working posture, but it is not a medical treatment. Ongoing or severe pain requires professional assessment.
Final Thoughts
The best office chair for long hours is the one that fits your body, supports the tasks you perform and remains easy to adjust throughout the day. For some users that will be the automated X7. Others may prefer the precise mechanical support of the E3 Pro, the recovery-focused E3 Ultra or the simpler E3 Air.
Whichever model you choose, take time to set it up properly and keep moving during the day. A good chair can support better working habits, but it cannot replace them.
Product specifications, configurations, prices and availability may change. Confirm the current information on the relevant HBADA product page before purchasing.
Aug 25, 2026
Best HBADA Office Chairs for Long Hours and Back Pain Relief (2026)
Updated August 2026
Eight hours at a desk has a way of exposing every weakness in a chair. A backrest that felt acceptable in the morning may feel unsupportive by mid-afternoon, while poorly positioned armrests can leave your shoulders doing more work than they should.
Quick Answer There is no single best office chair for every long-hour user. The HBADA X7 is the strongest match for people who want automatically adjusting lumbar support. The E3 Pro focuses on precise, multi-zone lower-back adjustment. The E3 Ultra is better suited to users who value a footrest and deeper recovery breaks, while the E3 Air covers the essential ergonomic adjustments at a more accessible level.
This guide compares the main differences without assuming that the most expensive or feature-heavy model is automatically the right one. For a broader buying checklist, see our ergonomic office chair buying guide .
Table of Contents
What matters during long workdays?
Quick model comparison
HBADA X7: automatic lumbar adjustment
HBADA E3 Pro: targeted lumbar adjustment
HBADA E3 Ultra: recline and recovery breaks
HBADA E3 Air: practical everyday support
How to choose the right model
How to set up your chair
When to seek medical advice
Frequently asked questions
What Matters During Long Workdays?
The word “ergonomic” on its own does not tell you whether a chair will fit your body or remain comfortable throughout the day. Fit and adjustability matter more than the label.
OSHA’s computer workstation guidance recommends looking at the backrest, seat, armrests and base together. That is a useful way to assess a chair because one adjustment cannot compensate for an otherwise poor fit.
Lumbar support: It should meet the natural curve of your lower back without feeling like a hard point pressing into it.
Seat height and depth: Your feet should be supported, and the seat edge should not press into the backs of your knees.
Recline: Changing position during the day is generally more useful than trying to hold one “perfect” posture for hours.
Armrest adjustment: Your forearms should be supported without forcing your shoulders upward.
Breathability: Mesh and ventilated surfaces can make long sessions more comfortable in warmer rooms.
Stable construction: The chair should feel secure during movement, recline and everyday use.
HBADA Chair Comparison for Long Hours
Model
Best suited to
Lumbar approach
Break and comfort features
Consider before buying
HBADA X7
Users who want support that adjusts with less manual input
Smart lumbar tracking and automatic adjustment
Ventilated seat, massage functions and broad adjustability
More functions mean more controls and a higher price tier
HBADA E3 Pro
Users who want detailed mechanical lumbar adjustment
Three-zone adaptive lumbar support
Multi-position recline and highly adjustable armrests
Lumbar settings still need to be adjusted to the individual user
HBADA E3 Ultra
Users who take reclined recovery breaks during the day
Three-zone elastic lumbar support
Deep recline and an integrated footrest
The footrest is useful for breaks, not a substitute for regular movement
HBADA E3 Air
Users who want the main ergonomic adjustments without smart functions
Adjustable lumbar support
Breathable mesh and adjustable upper-body support
Offers fewer automated and recovery-focused features
HBADA X7: Automatic Lumbar Adjustment
Most people do not remain in one position for an entire workday. They lean forward to type, turn during calls and recline while reading. This is where the X7’s smart lumbar system is most relevant: it is designed to follow changes in sitting position instead of relying only on one manually fixed setting.
The model also combines a ventilated seat, massage functions, adjustable head support and 720° armrests. Those features make the X7 particularly relevant for long desk sessions in which cooling, arm positioning and changes of posture all matter.
The X7 is not automatically the correct chair for everyone. Someone who prefers simple mechanical controls may not need its additional technology. Users should also check the current dimensions, recommended height range and available configuration before ordering.
View the HBADA X7
Owners can also consult the HBADA X7 charging and battery guide for information about its powered functions.
HBADA E3 Pro: Targeted Lumbar Adjustment
The E3 Pro takes a more mechanical approach. Its three-zone lumbar system is designed to support the centre and sides of the lower back, allowing users to fine-tune the contact rather than depend on a single lumbar pad.
This can be useful for someone who already knows where they prefer more or less support. The chair also offers multi-position recline and extensively adjustable armrests, helping it adapt between typing, reading and relaxed sitting.
It is better to describe the E3 Pro as a chair for targeted lumbar support, not as a treatment for back pain. The right setting still depends on the user’s height, body proportions, desk height and sitting habits.
View the HBADA E3 Pro
HBADA E3 Ultra: Recline and Recovery Breaks
A long workday should not mean staying upright and motionless for eight hours. The E3 Ultra is the more break-oriented option in this comparison, combining adjustable lumbar support with deeper recline and an integrated footrest.
That setup is useful for short periods of reading, taking a call or reclining between focused tasks. It does not replace standing, walking or changing position, but it gives users another supported posture when they need a brief pause.
Because the E3 Ultra is available in different configurations, check the selected model, colour and footrest option on the product page before purchasing.
View the HBADA E3 Ultra
HBADA E3 Air: Practical Everyday Support
Not every buyer needs automatic lumbar tracking, massage or a footrest. The E3 Air is intended for people who mainly want an adjustable, breathable office chair for everyday desk work.
Its mesh construction helps with airflow, while the lumbar, headrest and armrest adjustments cover the areas most users need to configure. It has fewer advanced functions than the X7 and fewer break-focused features than the E3 Ultra, but that simpler design may be exactly what some home offices require.
View the HBADA E3 Air
How to Choose the Right Model
Start with the problem you are trying to solve rather than the longest feature list.
Choose the X7 if you want lumbar support that responds automatically as your position changes.
Choose the E3 Pro if you prefer detailed mechanical control over lower-back support.
Choose the E3 Ultra if a footrest and supported reclining breaks are important to you.
Choose the E3 Air if you want breathable, adjustable everyday seating without paying for functions you may not use.
Before deciding, compare seat height, seat depth, overall dimensions, weight capacity and recommended user height. Those measurements are often more important than small differences in the number of adjustment settings.
How to Set Up an Office Chair for Long Hours
Sit fully against the backrest before positioning the lumbar support.
Adjust the seat so your feet rest flat on the floor or on a stable footrest.
Leave a small gap between the seat edge and the backs of your knees.
Position the armrests so your shoulders remain relaxed and your elbows stay close to your body.
Use a slight recline when comfortable instead of forcing yourself to remain perfectly upright.
Recheck the settings when your task changes, especially when moving between typing, reading and reclining.
Stand up and move regularly. No chair removes the need for movement.
Maintenance also affects long-term comfort. A worn seat, loose armrest or unstable mechanism may change how the chair supports you. Our guide to how long an office chair lasts explains what to monitor over time.
Health note: An appropriately fitted chair may help reduce strain associated with poor workstation positioning, but an ergonomic chair does not diagnose, treat or cure back pain. Persistent, severe, worsening or radiating pain should be discussed with a qualified doctor or physiotherapist.
Frequently Asked Questions
Which HBADA chair is best for long working hours?
The X7 is the strongest match for users who want automatic lumbar adjustment. The E3 Pro may be more suitable for people who prefer detailed mechanical control, while the E3 Air provides a simpler everyday option. Body fit should remain the deciding factor.
Which HBADA chair offers the most targeted lumbar adjustment?
The E3 Pro uses a three-zone adaptive lumbar system intended to provide adjustable support across the centre and sides of the lower back.
Is the HBADA X7 worth considering for an eight-hour workday?
It may be a good fit if you value automatic lumbar tracking, ventilation and other powered comfort functions. Buyers who prefer a simpler chair may find that a mechanically adjustable E3 model meets their needs.
Which HBADA ergonomic office chair includes a footrest?
The E3 Ultra is available with an integrated footrest and is the most break-oriented option in this comparison. Always verify the selected variant because configurations can differ.
Do I need an expensive chair for long hours?
Not necessarily. Correct dimensions and useful adjustments matter more than price alone. The E3 Air covers the main ergonomic fundamentals for users who do not need smart tracking, massage or an integrated footrest.
Can an ergonomic chair fix back pain?
No. A properly adjusted chair may help reduce strain and support a more comfortable working posture, but it is not a medical treatment. Ongoing or severe pain requires professional assessment.
Final Thoughts
The best office chair for long hours is the one that fits your body, supports the tasks you perform and remains easy to adjust throughout the day. For some users that will be the automated X7. Others may prefer the precise mechanical support of the E3 Pro, the recovery-focused E3 Ultra or the simpler E3 Air.
Whichever model you choose, take time to set it up properly and keep moving during the day. A good chair can support better working habits, but it cannot replace them.
Product specifications, configurations, prices and availability may change. Confirm the current information on the relevant HBADA product page before purchasing.
Aug 25, 2026


